Whether you are a contractor or work in-house, you know that a construction project requires a time-sensitive allocation of several resources; these resources include budget, team, timelines, and materials. One of the most difficult tasks to carry out is ensuring that the required materials are procured and ready in the right amounts and at the right time. This is a task a material takeoff can swiftly assist with.
If this isn’t ringing any bells, then fret not, because after this article, you won’t be lost on a material takeoff’s definition, its significance for contractors, and how to efficiently conduct one with either paper prints or digital ones. By the end, you will fully comprehend the workings of a material takeoff and how it can change the dynamics of construction projects for the better.
What Exactly is a Material Takeoff?
In a construction context, a Material Take Off (MTO) document outlines the required materials for a project in detail. Each item, such as steel beams and screws, is individually listed with their corresponding quantities.
Picture it as drafting a shopping list before actually going to the grocery store. Everyone wants to ensure that they have sufficient amounts of all necessary goods, while simultaneously avoiding spending money wastefully. A material takeoff assists in eliminating both over-ordering and under-ordering of materials, something that could result in costly holdups or deficiency on the site.
Regardless of if it’s a new residential house, installing a new commercial HVAC unit, or remodeling an office, patience is guaranteed with a material takeoff.
Why Should Contractors Care About Material Takeoffs?
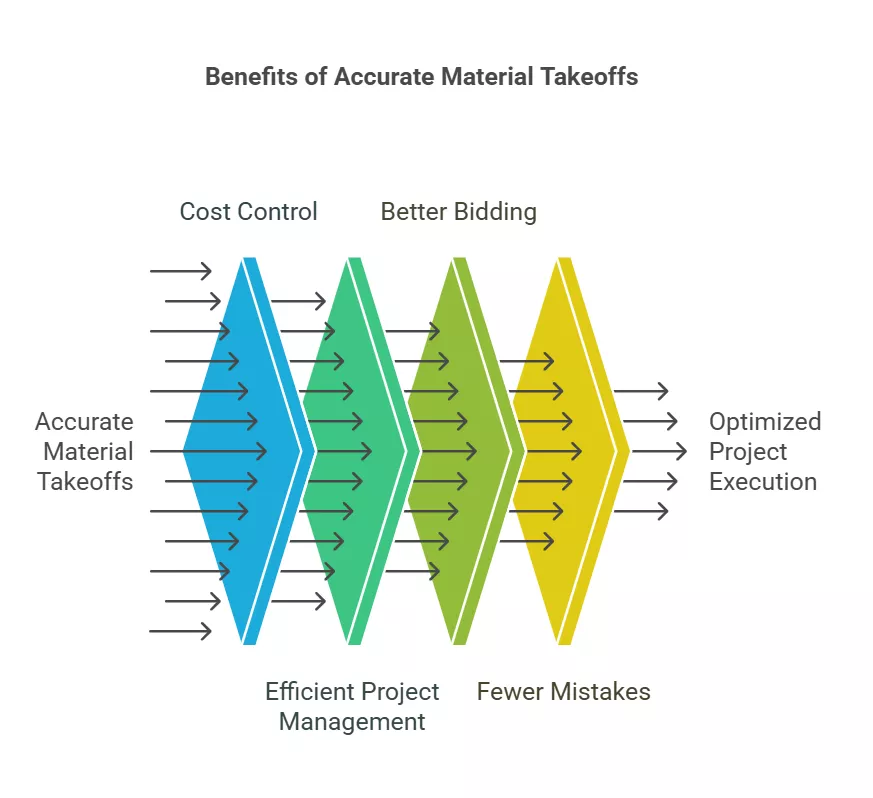
Good material takeoffs aren’t just a luxury—they’re essential. Here’s why:
- Cost Control: When you know exactly what materials you need, you can create a much more accurate budget. This helps prevent unexpected costs and reduces the chances of going over budget.
- Efficient Project Management: An accurate material takeoff lets you order all your materials ahead of time, ensuring they’re delivered when you need them. This helps keep your project timeline on track without unnecessary delays.
- Better Bidding: When it comes time to submit a bid, having a precise material takeoff allows you to price out your project more accurately. Clients will appreciate your attention to detail and the fact that your estimate reflects real material costs, which could give you an edge over the competition.
- Fewer Mistakes: One of the most costly errors you can make on a construction project is running out of materials or having the wrong type on hand. A solid material takeoff helps you avoid these costly mistakes.
What’s Included in a Material Takeoff?
A material takeoff isn’t just a list of “stuff.” It’s a detailed document that includes critical information. Here’s what it typically includes:
- Quantities of Materials: This is the heart of the material takeoff. It includes exactly how much of each material is needed, whether it’s the number of bricks, feet of piping, or square footage of drywall.
- Dimensions: The size and measurements of each material, like the length, width, or volume. This is particularly important for things like flooring, siding, or insulation.
- Material Type & Specifications: Not all materials are created equal. The material takeoff should specify the type of material (e.g., grade of steel, type of concrete) so that you know exactly what you’re ordering.
- Part Numbers: These are unique identifiers used by manufacturers and suppliers. It ensures that you order the exact product you need.
- Waste Allowance: Materials like wood, drywall, and metal often have waste. You might have off-cuts or accidental damage, so it’s important to add a little extra to your takeoff (typically 5-10%) to account for this.
- Unit Conversions: Sometimes, materials are measured in different units (e.g., cubic feet vs. square feet). You’ll need to convert these measurements so everything adds up correctly.
Manual vs. Digital Material Takeoffs: Which One Should You Use?
In the past, contractors would create paper blueprints and with a scale ruler, measure and list the materials which was referred to as a manual takeoff. Even though this way of construction is still used, especially in manual jobs, it is particularly time consuming and has a very high probability of being affected by human error while taking note of the various aspects and details.
Recently there has been a surge in the use of software tools and as a result digital takeoffs have started to dominate the traditional methods of construction and blueprints. Additionally, tools of this nature are much quicker and have the added ability to instantly calculate the quantities of materials that are required which is a step to making accurate takeoffs.
There is no definitive cost effective measure between manual and digital takeoffs. This largely depends on the complexity and size of the project. However, small residential jobs support manual methods, larger projects are better suited for digital takeoffs.
How to Do a Material Takeoff: A Simple, Step-by-Step Process
Now that you know what a material takeoff includes, let’s walk through the actual process of creating one. This step-by-step guide will help you get started:
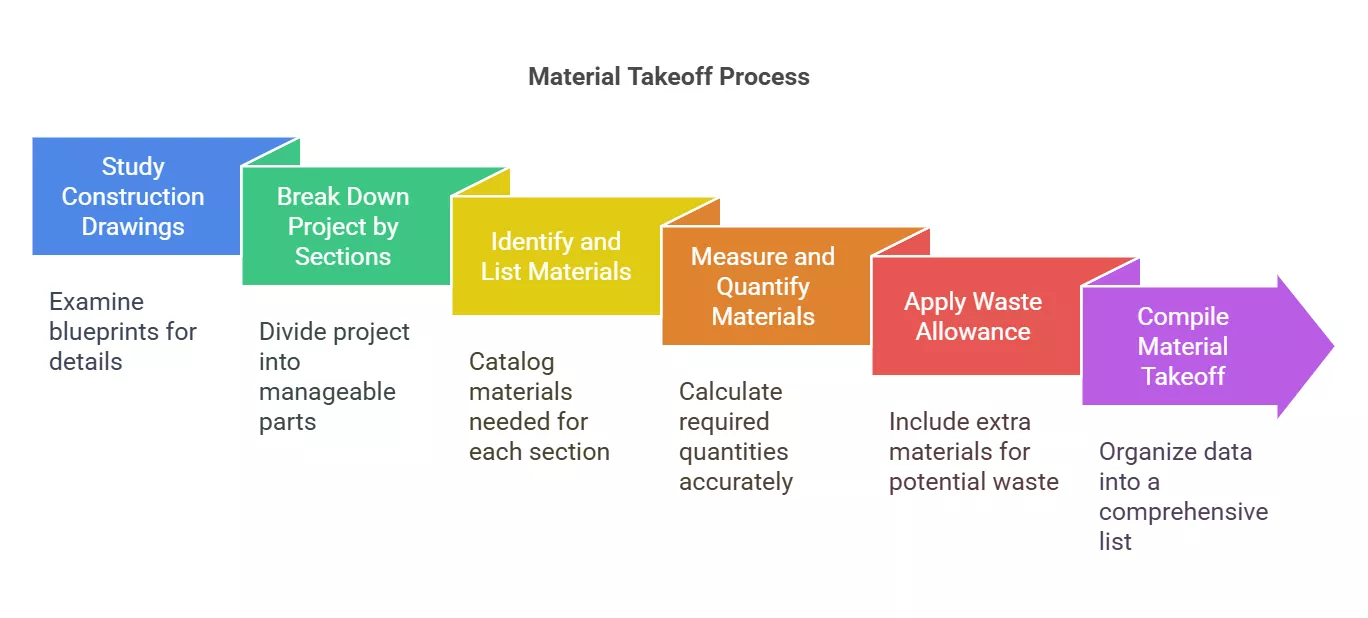
Step 1: Study the Construction Drawings
The first step is collecting all construction plans as your outlines and blueprints will detail what you are constructing, as well as its dimensions and materials.
An in-depth comprehension of the plans is crucial; search for any changes that may have been added, as changes to construction plans are often made throughout the process.
Step 2: Break Down the Project by Sections
Plan the work in sections or stages instead of doing it all at once so you won’t get overwhelmed. For example, with construction, you may complete the foundation, then move on to framing, then roofing, etc. This will help you remain orderly and ensure you are not skipping any important steps.
Step 3: Identify and List Materials
Go through the drawings and identify all the materials you’ll need for each section. For example, if you’re working on the framing, list the lumber, nails, and fasteners required. If you’re installing HVAC systems, list the ducts, vents, and insulation.
It helps to highlight or mark these materials on the drawings, so you don’t miss anything.
Step 4: Measure and Quantify Materials
Now it’s time to measure. For each material, figure out how much is needed. For example, if you need drywall, calculate the total square footage. If you’re dealing with pipes, measure the total linear footage required.
Be careful with your measurements. This is where mistakes can lead to big problems down the road.
Step 5: Apply Waste Allowance
Remember that you’ll need to account for waste—whether from cutting materials, mishaps, or damage. Adding a small percentage to your material quantities (usually around 5-10%) will ensure you don’t run short.
Step 6: Compile Your Takeoff
Finally, gather all your data into a clear and organized list. This is your material takeoff sheet. If you’re using software, this can be automatically generated, but if you’re doing it manually, use a spreadsheet or a template to keep everything neat.
Avoid These Common Material Takeoff Mistakes
While it might seem simple, material takeoffs come with their own set of challenges. Here are some common mistakes to avoid:
- Skipping Updates: Always make sure you’re using the latest version of the drawings. Revisions happen, and missing one can lead to inaccurate material counts.
- Forgetting Waste: Don’t forget to factor in waste. Otherwise, you may run out of materials before the job is done.
- Not Double-Checking Quantities: Mistakes in counting or measuring materials can throw off the entire takeoff. Take your time and check your work.
- Overlooking Hidden Items: Sometimes, materials aren’t obvious on plans—like behind walls or in hidden spaces. Make sure to account for everything.
Conclusion: The Power of a Solid Material Takeoff
To sum all of this up, a material takeoff can be extremely useful for contractors. It allows you to control your budget, reduce mistakes, and maintain project timelines. Whether you’re working with analog methods or contemporary digital tools, a correct material takeoff can be the difference between a successful project and a blunder.
Once you follow the procedure outlined here, I am sure that you will approach your next project with much more assurance, knowing that all your materials are available and reasonably priced versus your estimated costs and bids. This one is a small, but extremely powerful step that can change so much in construction and project management.

0 Comments