Before wood is ready to use in construction, furniture, or remodeling projects, it goes through a long and detailed preparation process. At Axis Estimation, we often help clients understand this process while offering our lumber takeoff services. Understanding the steps involved in lumber preparation helps you estimate better and avoid surprises during building.
Let’s walk you through each stage of the lumber preparation process, using easy words and real-life experience to explain it all.
Step 1: Choosing and Cutting the Trees
The journey starts with choosing the right type of tree. Trees like pine, fir, cedar, and oak are cut based on what the wood will be used for. These trees are carefully selected and cut down using machines or chainsaws.
Quick Fact: Softwoods like pine are often used for house framing, while hardwoods like oak are used for furniture and flooring.
Step 2: Transporting Logs to the Mill
Once the trees are cut, the logs are loaded onto trucks and taken to a sawmill. Special equipment is used to avoid damaging the logs during transport.
Real-World Note: Damaged logs at this stage can lead to extra waste. We’ve seen projects where 10% of the delivered logs couldn’t be used.
Step 3: Removing Bark and Cleaning Logs
At the sawmill, machines remove the bark from the logs. This step prepares the wood for cutting and removes dirt, insects, and other debris.
Tip from Us: Cleaner logs mean more accurate cuts and less waste—which helps with better lumber takeoff reports.
Step 4: Cutting the Logs into Boards
After cleaning, logs are cut into planks or boards using large saws. The way they are cut can affect strength, appearance, and cost.
Plain sawing is fast and less expensive.
Quarter sawing is more precise and shows beautiful wood patterns.
Our Experience: Quarter-sawn lumber is often chosen for fancy projects like wooden staircases and trim work.
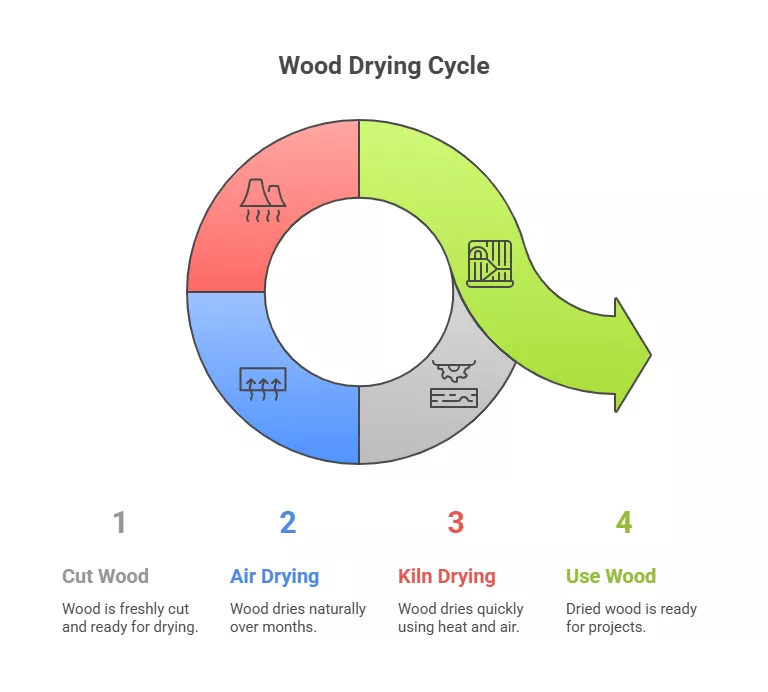
Step 5: Drying the Wood (Seasoning)
Freshly cut wood has a lot of moisture. It needs to dry before being used. Drying makes the wood stronger and stops it from shrinking or bending later.
Two common methods:
Air Drying: Takes several months; uses fresh air.
Kiln Drying: Takes a few days; uses heat and controlled air.
From Our Projects: We usually recommend kiln-dried lumber because it gives more consistent results.
Step 6: Planning and Smoothing the Wood
Once dried, the wood is run through machines that smooth and shape it. This makes the wood easier to handle and gives it a uniform size.
Construction Tip: Planed wood is slightly smaller than rough-sawn wood. We include these adjustments in our lumber takeoff services to avoid mistakes.
Step 7: Grading and Sorting
The lumber is then checked and graded. This grading shows how strong and good-looking the wood is.
Structural grade is used for frames and supports.
Appearance grade is used for visible parts like flooring or cabinets.
Real Example: We once worked on a house where all exposed beams had to be high-grade wood, which we carefully included in the estimate.
Step 8: Treating the Lumber (If Needed)
Some wood is treated with chemicals to protect it from bugs, mold, or rot. Treated wood is used outside or in wet areas like basements.
Helpful Tip: Always tell your estimator if you need treated lumber. It changes both the weight and cost.
👉 Learn how we handle treated vs. untreated wood in our lumber takeoff reports.
Step 9: Delivery and Storage
Once ready, lumber is bundled and delivered to job sites. It’s important to store the wood in a dry, flat place with good air flow.
On-Site Advice: We’ve seen delays when lumber was stored poorly and got damaged. Protecting it saves money and time.
Why This Long Process Matters
Lumber preparation isn’t just about cutting trees. Each step helps make the wood safe, strong, and ready for building. By knowing this process, you can:
Choose the right type of wood
Plan better timelines
Avoid costly mistakes
At Axis Estimation, we use this knowledge to offer accurate lumber takeoff services that help contractors, builders, and homeowners plan smarter.
Final Thoughts
Understanding how lumber is prepared before use helps you plan better, build stronger, and avoid waste. Each step matters—from cutting trees to grading and delivery.
If you’re planning a building project and want accurate material estimates, contact us at Axis Estimation. Our detailed lumber takeoff services can save you time, money, and effort.
FAQs
Q1: Why does lumber need to be dried?
Because wet wood can shrink, bend, or break over time. Drying makes it stable and strong.
Q2: What’s the difference between air-dried and kiln-dried lumber?
Air-dried lumber takes longer and depends on weather. Kiln-dried lumber is faster and more consistent.
Q3: Can I use untreated wood outdoors?
No. You need pressure-treated wood for decks, fences, and outdoor structures.
Q4: What is a lumber takeoff?
It’s a report that tells you how much lumber you’ll need for your project, based on your drawings or plans.
0 Comments